Here's some timely information from Lifehacker. A couple of months ago, the unreliability of the aging Airport express I was using as a wireless access point in my detached garage pushed me into action. Ok, I'm exagerating a little here. I had been annoyed by this for a while, but it was fairly low on the priority list.
I use a wired gateway/router provided by my ISP as the router for my network, then I have two wireless access points, one for the house and one for the garage. In the house I have an Asus RT-N66U (I realize I don't need a router here, but I wanted the option to use it as one in the future). This replaced a Linksys WRT610n, which is a fairly new router, but gave me enough problems that I wasn't happy with it. However, when I set up the Linksys router as an access point in the garage, it works like a champ.
The Lifehacker article primarily deals with setting up an old router as a wifi repeater. Since I ran an Ethernet cable under the house to each of the access points (fun, let me tell you) I didn't need this functionality. There isn't much to do technically. Go into the setup for each access point using a browser, to make life easier, I recommend connecting to the access point directly using an Ethernet cable. Set it to act as an access point instead of a router and set each access point to broadcast the same wireless network. I have 802.11g and 802.11n 5GHz networks broadcasting, for 802.11g, you want to make sure they are operating on different channels with minimal overlap. For two access points, use channels 1 and 11. I haven't played around the 802.11n settings yet, both access points are set to their automatic values. Generally, my understanding is that there is much less interference possible in this band. I may come back to this in the future.
Tuesday, July 30, 2013
Monday, July 29, 2013
Kitchen PC: The Hardware
Part of the reason I decided to resurrect this blog
was I had a cabinet full of old computers, internet appliances, and AV
equipment that I wasn't using, but they work well enough that I really
didn't want to dump them in the e-waste. A couple weeks ago or so, I decided to adapt an old tablet computer to be an under-the-counter kitchen PC. My goal is to have a PC in the kitchen that I can use to control a whole-house music system. I suspect with this project the software is going to change more frequently than the hardware so I am going to divide posts on this project along those lines. I'll talk about the my generation one hardware configuration here, and my first stab at a software configuration in a later post.
This isn't my first attempt at a whole house audio system. I have had some of the music nodes active, at least I have played around with them previously, but in order to play anything I had to go to sneak into the den where the general use computer resides. This is decidedly a low WAF technique. For a while I was using a remote control app on my phone to control the music on my den PC, but this was annoying for me, especially since that computer was often tied up doing other things. I could stream directly from my phone to a single music node, but in order to stream from your phone to multiple nodes, at least using an Airplay based system, you need a PC committed to the task. When I started brainstorming this project, I thought I would hide a PC in the laundry room, pantry, or on top of the kitchen cabinets, but since I was planning on adapting a tablet I thought it might be useful to try to take advantage of the screen rather than hide it and mount it underneath the cabinets and actually use it as a kitchen PC. The spot next to the refrigerator was good since I wasn't exactly sure how this would look and that spot is normally a mess anyway.
Starting materials
The tablet PC I am using is an HP TC4200. I bought this PC of Ebay for about $100 several years ago, when it was already obsolete, for my wife to use for her lectures when she started teaching. I spent another $50 or so on more memory, a new hard drive and (I think) a new battery. She used it for a year or two before she was able to get a new tablet PC. It hasn't done much since then except be my guinea pig.

From PC Magazine (this tablet PC was quite expensive, back in the day)
The audio nodes are based around first generation Airport Express units. As I mentioned before, I have a few of these. I used them as both a router and an access point over the years as well as units to just serve as Airplay nodes, but recently they found themselves in the future e-waste cabinet. For reasons that aren't clear to me, they seem to develop problems working as a wireless router or access point. It turns out that even when these units are no longer ideal as a reliable access point, they can still work fine as an Airplay output node, especially if you operate them wired into the ethernet network. I've been trying them out in this capacity. Streaming from one of our i-devices to an Airport Express set up in the kitchen.

From Gdgt
For each audio node I would like to have a decent amplifier and speakers. For the amplifiers I'm planning on using T-class units. I already have 2, a Dayton Audio DTA-1 and a Lepai LP-A68. For the speakers I am planning on using pairs of Dayton B652. I have two pairs of these already one of which I am using and the other I am planning on swapping out from another location. I purchased these all from Parts Express. For future nodes my plan is to use Lepai-2020A+ for the amplifier, although I may swap out the amplifier attached to the PC with a higher quality USB soundcard/amp, perhaps a Topping TP30. I'll also try to find smaller, higher quality speakers. I think I may swap out the Polk RM6751 speakers in my theater for something else (thinking Pioneer SP-BS22-LR) and use them around the house.
Initial placement
As I mentioned before, placed the tablet PC underneath the cabinet, next to the refrigerator. The nice part about this arrangement, besides being out of the way, is that when the screen is fully closed, the pc is almost totally hidden from view. Initially I mounted the computer under the cabinet similar to this Lifehacker inspired post using two coat hangers held in place by two shelving screws, but this prevented the screen from folding up all the way, which I didn't like. For my second attempt I used four pieces of 4"x2" industrial strength Velcro, to hold the computer in place, two on each side of the computer. Before attaching the Velcro pieces to the computer I cut them along the access panel seams, in the unlikely event I want to change out the hard disk or the battery. At first I was concerned the PC would fall down during the 24 hours it takes for the adhesive to take hold, so I tried to use some fishing wire tied around the leftover screws to strain relief the velcro. It turned out this wasn't necessary and the Velcro adhesive worked fine without any additional support.


Here's the alcove with the kitchen PC with the screen closed. I should really clean this area up.

Here's the kitchen PC screen open.
That's the starting hardware configuration. I'll talk about the software configuration in a later post. Maybe I'll clean up the pile of paperwork too!
Upgrade ideas
1. Better speakers.
2. Integrated USB sound card and amplifier combo.
3. IR receiver to control with a traditional (i.e. non-iPhone remote).
4. USB notifier light, something like this. I'm not sure exactly what I would want it to tell me, but I think this would be straightforward to do.
5. Integrate with a motion activated camera to log who comes to the front/back doors.
6. I wonder if I could use this PC as a bluetooth speaker phone?
7. USB thermometer and/or humidity sensor to display or track indoor temperate.
8. Wireless USB thermometer or weather station to display and track outdoor weather info.
Update! (8/2/13)
My first take on the software configuration for the kitchen PC is here.
Monday, July 22, 2013
Airplay in my car (Updated!)
I was inspired by this recent Lifehacker post by Ben Novakovic to try to assemble an Airplay receiver for my car. My car doesn't have a bluetooth receiver while I could probably put something together that used bluetooth, but I liked the idea of using wifi based Airplay better. In Ben's post, he converted a new 2nd generation Airport Express to run off a 5V USB power supply. I already have several 1st generation Airport Express units, a few of which I wasn't using. Assuming they can also be run of a 5V USB power supply, I would like to use one of them instead. I should note that while this worked great in my garage, I encountered audio problems, probably due to the wifi connection, as I was driving around town.
Hardware Setup
A Google search revealed that power supply failure on the 1st generation Airport Express units was fairly common and there were a few useful posts on converting them to run off USB. Like the 2nd generation unit, the 1st generation Airport Express runs off 3.3V and 5V. The previous posts, used a card reader board to step down the voltage, my plan was to use the step down converter, Ben specified in his post.

The 1st generation Airport Express, with the case ready to be opened.
As you'd expect from an Apple product, the 1st generation Airport Express is a pain to open. The two plastic halves of the unit are melted together. Rather than use a saw, I used a small screwdriver to break the plastic seam and pry the unit open. Once open the power supply can easily be removed with a single screw.

The open Airport Express, The top half is the power supply.
 The power supply half of the Airport Express with the power supply removed

There are six wires coming out of the Airport Express controller going to a socket connector. Three black (ground), two orange (3.3V) and one red (5V). I wanted to preserve the connector on the Airport Express controller in the event I wanted to reassemble the Airport to it's original state so I constructed a pin connector that would mate to it. I shorted the same color wire pins together and soldered a couple inches of wire off the black (ground), orange (3.3V) and red (5V) leads. For the USB connector, I sacrificed a USB cable then soldered the red (5V) and black (ground) to the matching pin connector cable. My soldering skills aren't that great, so I soldered a few inches of wire onto the step-down converter leads, black (ground), red (VIN, i.e. voltage input 5V), orange (OUT, i.e. voltage output, 3.3V). Finally, I soldered connector/USB wires to the appropriate wire lead on the step down converter. I secured the step-down transformer and strain-relieved the wires using kapton tape. There is probably a better way to do this, but I am used to clugeing things with kapton tape.

The wiring harness I assembled. The step-down transformer is on the
right the connections to the controller half of the Airport Express are
on the left..

The wiring harness secured to the empty half of the Airport Express with kapton tape.

It powers up!

I put the Airport Express back together with white vinyl tape that I had. I also strain-relieved the USB cable.
Software Configuration
The process for configuring the 1st generation Airport Express is similar to the process outlined in the Lifehacker article, although with fewer options. The important point is to set the Airport Express to create a wireless network and to enable the Airplay. I gave my wireless network a clever name. To set the Airport Express create a wireless network, open up the Airport Utility (I used the Windows version) and click "manual setup". You should be in the "Airport" configuration section. On the Base Station tab, give the Airport Express a name and a password. On the wireless tab, change the wireless mode to create a wireless network. Give your network whatever level of security you feel will make your network safe as you zoom around town. I don't think the radio mode matters, but if you are attempting to do this with an 802.11n capable 1st generation unit (Gen 1.5) you should make sure your network is 802.11g compatible. Next go to the Music configuration section and enable Airplay. Finally save your configuration.
The process for configuring the 1st generation Airport Express is similar to the process outlined in the Lifehacker article, although with fewer options. The important point is to set the Airport Express to create a wireless network and to enable the Airplay. I gave my wireless network a clever name. To set the Airport Express create a wireless network, open up the Airport Utility (I used the Windows version) and click "manual setup". You should be in the "Airport" configuration section. On the Base Station tab, give the Airport Express a name and a password. On the wireless tab, change the wireless mode to create a wireless network. Give your network whatever level of security you feel will make your network safe as you zoom around town. I don't think the radio mode matters, but if you are attempting to do this with an 802.11n capable 1st generation unit (Gen 1.5) you should make sure your network is 802.11g compatible. Next go to the Music configuration section and enable Airplay. Finally save your configuration.
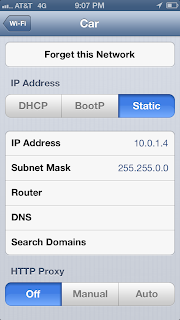
Your phone, or other Airplay transmitting device should be configured as described in the Lifehacker article, but I'll summarize them here. The goal is to connect to the airport express wireless network for music but use your phone's cellular network connection for data. You can set this up in advance either before you start or using a USB auto (12V) power adapter. Directions for an iPhone, summarized from the Lifehacker article are as follows: Go to the wifi settings then press the arrow next to your car's wifi network name to view the setup options. Change the IP address type to static and enter 10.0.1.4 for the IP address and 255.255.0.0 for the Subnet Mask. Leave Router, DNS, and Search Domains blank. After some initial road testing I played around with the settings some more. I'll explain them in more detail below.

Car Integration!
I want to keep my Airport Express hidden in my glove box. I'm not really a car guy, but I figured I could wire some USB ports into the glove box. I also wanted to run a hidden audio cable from the stereo head unit to the glove box where it would connect to my hidden Airport express. Fortunately in my car, the fuse box is right next to the glove box. I used an Add-a-circuit fuse tap and an appropriate fuse to add a circuit and connected it to this 12v-to-5V Step-down voltage converter with two USB ports. there is also a single USB version. I should note that I was pretty nervous about violating my "don't break the car" spousal pledge. This post on a similar car to mine gave me the courage to try.
I want to keep my Airport Express hidden in my glove box. I'm not really a car guy, but I figured I could wire some USB ports into the glove box. I also wanted to run a hidden audio cable from the stereo head unit to the glove box where it would connect to my hidden Airport express. Fortunately in my car, the fuse box is right next to the glove box. I used an Add-a-circuit fuse tap and an appropriate fuse to add a circuit and connected it to this 12v-to-5V Step-down voltage converter with two USB ports. there is also a single USB version. I should note that I was pretty nervous about violating my "don't break the car" spousal pledge. This post on a similar car to mine gave me the courage to try.

The wiring harness to convert 12v power from the car to two 5v USB connections

The USB power supply wired into the car. I'm close to violating my "Don't break the car" pledge
 Mazda doesn't make this simple. It's a miracle I didn't lose any screws.

 The end result!
For the audio cable, my car's stock stereo has an auxilary input jack near in the center console near the shifter. When I started out on this project, I was prepared to run a moderately visible mini cable (i.e. headphone jack) from this port into the glovebox. It turns out there is an inexpensive cable that plugs into the back of the head unit, replacing the console port with a mini cable that I can run to the glovebox. I imagine there may be similar cables available for other cars. The stock head unit has the capability to connect satellite radio that isn't being used. In my ideal world, I would tie into that port on the head unit and re-enable the console Aux port. I couldn't figure out how to easily do that, so I may come back to it later. I was also thinking I might open up the stereo again and add a line from the unused console Aux port to the glovebox. Then if I wanted to re-enable the console port, I could swap it easily. If I was really inspired, I could add a switch.

Once everything was connected I tried to hide it in the glove box as much as possible. I mounted the USB power transformer to the side of the glovebox with mounting tape, and the Airport Express on top of a plastic piece in the middle of the box. I also used a few pieces of electrical tape to hold the audio mini cable in place.

Everything connected and hidden away.
When I start the car it takes 30 seconds or so for the Car wifi network to come up. One issue, is my phone can still access my normal home wifi network in the garage. So I have to either switch it manually or start the music playing after I drive off.

Road Testing
In my garage, everything works perfectly, but taking it out for a drive it there seems to be a fairly severe audio skip problem. Doing some searching online revealed that this is a fairly common problem with Airplay through Airport Express Gen1 units, although I've never had a problem with this at home. I suspect driving around town you encounter a range of different 2.4GHz enviroments. I tried a few things to rectify this, and have seen some improvements. First I went into the Airport Express configuration application and into wireless settings. I clicked the Wireless Options button and did the following:
1. Set the wireless channel to 11
2. Set the multicast rate to 24Mbs
2. Enabled Interface Robustness
3. Enabled WPA security (previously, I used an open network)
Some more things to try:
1 It looks like because of car alarms, I might have better luck with channel 1.
2. I might try decreasing the broadcast power.
3. I'll try turning off the bluetooth on my phone. Although I have future plans for this.
If all else fails...
I have a bluetooth USB audio dongle. I'll swap out the Airport for this. Sad panda.
Update
I tried the things on my list and there are still audio dropouts. I ended up swapping the Airport Express out for a USB to 3.5mm bluetooth dongle. The nice thing is it is all still hidden in my glove box. I used this particular dongle with a 12V auto adapter and had all kinds of problems. It works so smoothly now, I think the problem was the power port I was using.
Upgrade ideas:
1. Tie into the Satellite connection on the head unit and re-enable the front panel Aux input.
2. If option 1 isn't possible, run a line from the front panel Aux input to the glovebox and integrate a switch.
3. I'd like to get a remote control, such as this one, secured to the steering wheel.
Thursday, July 18, 2013
Great moments in home theater computing
I just promised the babysitter that there would be sound for the TV the next time she came over.
I should note that this is my secondary system, not my theater, that we basically only use for the kids or video calls with the grandparents.
I should note that this is my secondary system, not my theater, that we basically only use for the kids or video calls with the grandparents.
Tuesday, July 16, 2013
Work in Progress: In-car Airplay

This is an example of low WAF
There's just some tidying up left to do on this project, and it was a lot of fun. I'll try to write it up soon.
Friday, July 12, 2013
Work in Progress: Kitchen PC

Caution: Work in progress! I'm repurposing an old tablet PC as an under-cabinet kitchen PC. Hopefully when it's done, it will be the brains behind a home brew poor man's whole house audio system a la Sonos. When it's more mature, I'll do a bigger post with links.
Wednesday, July 10, 2013
"New" Phone
This past month my wife and I were finally able to get in sync with our phone contracts. To mark this happy occasion I purchased us both iPhone 5 phones. Of course this means that Apple with come out with a new phone next month. After some soul searching I decided I was ok with this.
Tuesday, July 9, 2013
Back From the Dead
I started this blog to chronicle my, often unsuccessful, attempts to make a family friendly home theater PC sort of AV setup. Unfortunately, through a move and another baby I let the blog slide into the abyss. A few days ago, however, I happened to check the Blogger dashboard and it seems
that my measly comatose blog actually gets a few hits now and then. You know what? I still work on a number of projects that might be interesting to someone and let's be honest, an AV setup is never really finished. I'm going to try to bring the blog back!
For the hell of it, let's take a look at the todo list from 2010 and see what still applies. In future posts I'll elaborate on the things that are still applicable.
For the hell of it, let's take a look at the todo list from 2010 and see what still applies. In future posts I'll elaborate on the things that are still applicable.
Subscribe to:
Posts (Atom)